Toyota Corolla Cross: Removal
REMOVAL
CAUTION / NOTICE / HINT
COMPONENTS (REMOVAL)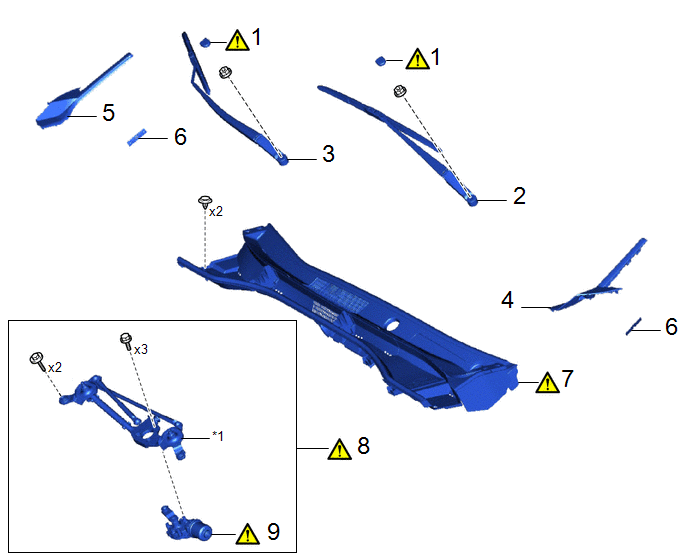
|
Procedure | Part Name Code |
.png) |
.png) |
 |
|---|---|---|---|---|---|
|
1 | FRONT WIPER ARM HEAD CAP |
85292B |
|
- | - |
|
2 | FRONT WIPER ARM AND BLADE ASSEMBLY LH |
- | - |
- | - |
|
3 | FRONT WIPER ARM AND BLADE ASSEMBLY RH |
- | - |
- | - |
|
4 | NO. 2 FRONT SIDE PANEL PROTECTOR LH |
53824D | - |
- | - |
|
5 | NO. 2 FRONT SIDE PANEL PROTECTOR RH |
53823G | - |
- | - |
|
6 | WINDSHIELD OUTSIDE MOULDING CLIP |
75545M | - |
- | - |
|
7 | COWL TOP VENTILATOR LOUVER SUB-ASSEMBLY |
55708 |
|
- | - |
|
8 | WINDSHIELD WIPER MOTOR AND LINK ASSEMBLY |
- |
|
- | - |
|
9 | WINDSHIELD WIPER MOTOR ASSEMBLY |
85110 |
|
- | - |
.gif)
|
*1 | WINDSHIELD WIPER LINK ASSEMBLY |
- | - |
CAUTION / NOTICE / HINT
NOTICE:
Make sure to hold the front wiper arm while lifting it, as lifting the front wiper arm by the front wiper blade may damage or deform the front wiper blade.
PROCEDURE
1. REMOVE FRONT WIPER ARM HEAD CAP

(1) Using a screwdriver with its tip wrapped with protective tape, disengage the claws to remove the front wiper arm head cap.
(b) Use the same procedure for the RH side and LH side.
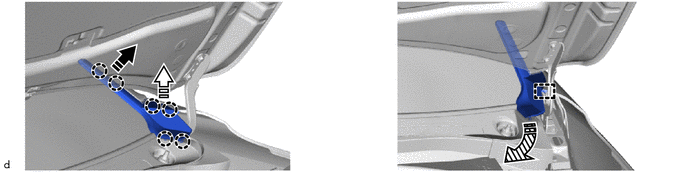
2. REMOVE FRONT WIPER ARM AND BLADE ASSEMBLY LH

3. REMOVE FRONT WIPER ARM AND BLADE ASSEMBLY RH

4. REMOVE NO. 2 FRONT SIDE PANEL PROTECTOR LH
.png) |
Remove in this Direction (1) |
.png) |
Remove in this Direction (2) |
.png) |
Remove in this Direction (3) |
- | - |
5. REMOVE NO. 2 FRONT SIDE PANEL PROTECTOR RH
(a) Use the same procedure as for the LH side.
6. REMOVE WINDSHIELD OUTSIDE MOULDING CLIP

|
|
Remove in this Direction |
- | - |
(b) Use the same procedure for the RH side and LH side.
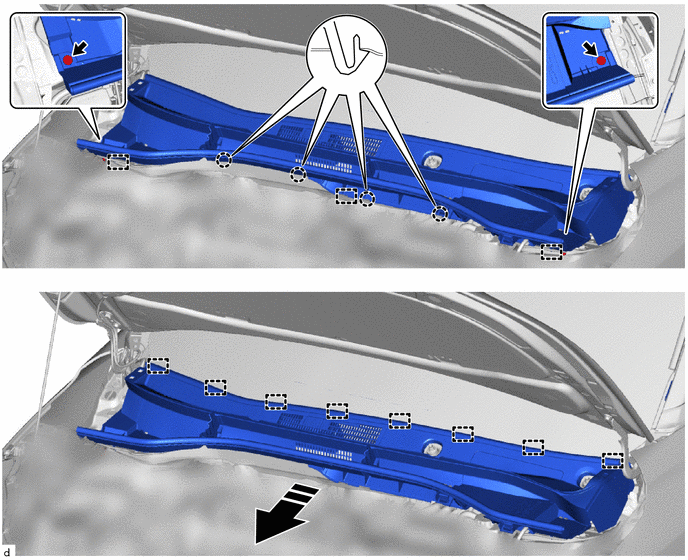
7. REMOVE COWL TOP VENTILATOR LOUVER SUB-ASSEMBLY
|
|
NOTICE: To prevent damage to the windshield glass, remove any foreign matter (sand, dust, etc.) from around the contacting surfaces of the cowl top ventilator louver sub-assembly and windshield glass. |
|
|
Remove in this Direction |
- | - |
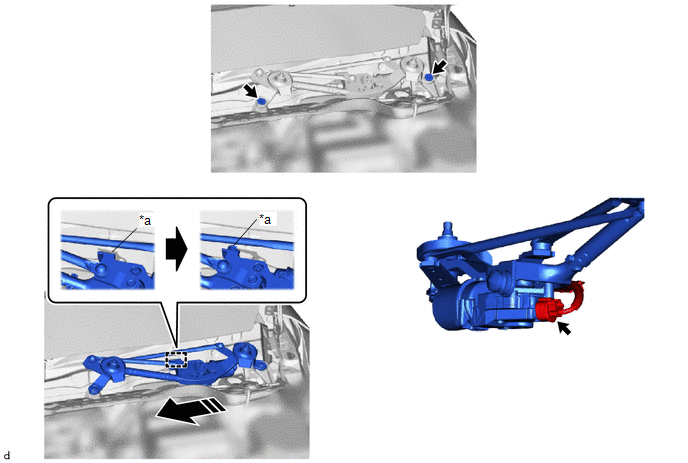
8. REMOVE WINDSHIELD WIPER MOTOR AND LINK ASSEMBLY
|
|
NOTICE: Be careful not to damage the windshield glass when removing the windshield wiper motor and link assembly. |
|
*a | Motor Grommet |
- | - |
|
|
Remove in this Direction |
- | - |
9. REMOVE WINDSHIELD WIPER MOTOR ASSEMBLY
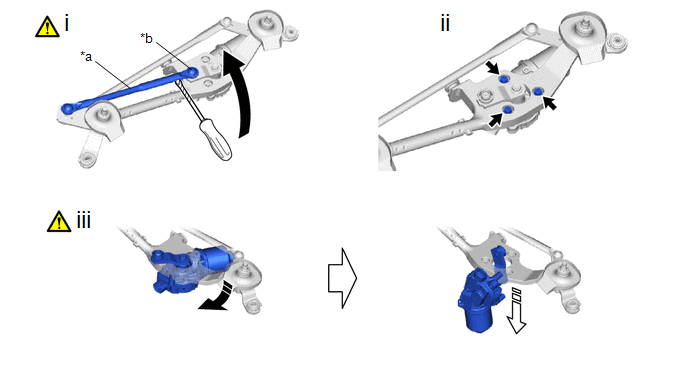
|
*a | No. 1 Wiper Link Rod |
*b | Pivot of Windshield Wiper Motor Assembly |
|
|
Remove in this Direction (1) |
|
Remove in this Direction (2) |
(1) Using a screwdriver with its tip wrapped with protective tape, separate the No. 1 wiper link rod from the pivot of the windshield wiper motor assembly as shown in the illustration.
(2) Remove the 3 bolts.
(3) Remove the windshield wiper motor assembly as shown in the illustration.


