Toyota Corolla Cross: Installation
INSTALLATION
CAUTION / NOTICE / HINT
COMPONENTS (INSTALLATION)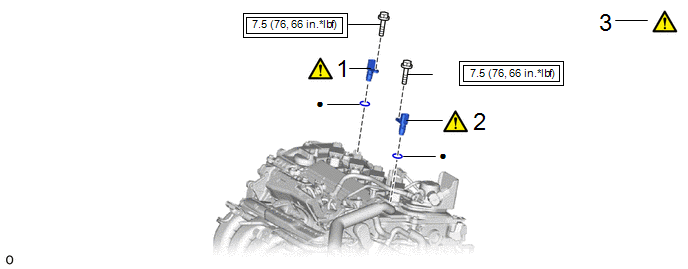
|
Procedure | Part Name Code |
.png) |
.png) |
 |
|---|---|---|---|---|---|
|
1 | CAMSHAFT POSITION SENSOR (for Exhaust Side) |
11102A |
|
- | - |
|
2 | CAMSHAFT POSITION SENSOR (for Intake Side) |
11102A |
|
- | - |
|
3 | ENGINE OIL LEAK |
- |
|
- | - |
.png) |
Tightening torque for "Major areas involving basic vehicle performance such as moving/turning/stopping" : N*m (kgf*cm, ft.*lbf) |
● | Non-reusable part |
|
★ | Precoated part |
- | - |
CAUTION / NOTICE / HINT
NOTICE:
This procedure includes the installation of small-head bolts. Refer to Small-Head Bolts of Basic Repair Hint to identify the small-head bolts.
Click here .gif)
PROCEDURE
1. INSTALL CAMSHAFT POSITION SENSOR (for Exhaust Side)
|
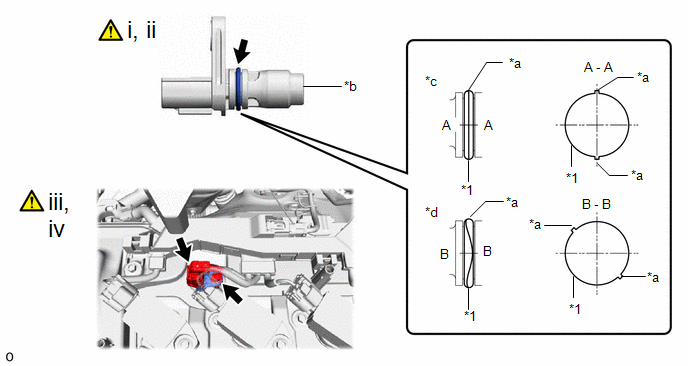
*1 | O-ring |
- | - |
|
*a | Seam |
*b | Camshaft Position Sensor Tip |
|
*c | OK |
*d | NG |
(1) Perform this procedure only when reusing the camshaft position sensor.
1. Clean the O-ring groove of the camshaft position sensor.
NOTICE:
Make sure the O-ring groove is free of foreign matter.
2. Install a new O-ring to the camshaft position sensor.
NOTICE:
Set the O-ring on the tip of the camshaft position sensor and roll it into the O-ring groove with bare hands to install it.
3. Check if the O-ring is twisted.
HINT:
Check the entire circumference of the seam of the O-ring for twisting.
(2) Apply a light coat of engine oil to the O-ring of the camshaft position sensor.
NOTICE:
If reusing the camshaft position sensor, be sure to inspect the O-ring.
(3) Using an 8 mm socket wrench, install the camshaft position sensor to the cylinder head cover sub-assembly with a new bolt.
Torque:
7.5 N·m {76 kgf·cm, 66 in·lbf}
NOTICE:
- If the camshaft position sensor has been struck or dropped, replace it.
- Make sure that the O-ring is not cracked or moved out of place when installing the camshaft position sensor.
(4) Connect the camshaft position sensor connector.
2. INSTALL CAMSHAFT POSITION SENSOR (for Intake Side)
.png)
|
*1 | O-ring |
- | - |
|
*a | Seam |
*b | Camshaft Position Sensor Tip |
|
*c | OK |
*d | NG |
(1) Perform this procedure only when reusing the camshaft position sensor.
1. Clean the O-ring groove of the camshaft position sensor.
NOTICE:
Make sure the O-ring groove is free of foreign matter.
2. Install a new O-ring to the camshaft position sensor.
NOTICE:
Set the O-ring on the tip of the camshaft position sensor and roll it into the O-ring groove with bare hands to install it.
3. Check if the O-ring is twisted.
HINT:
Check the entire circumference of the seam of the O-ring for twisting.
(2) Apply a light coat of engine oil to the O-ring of the camshaft position sensor.
NOTICE:
If reusing the camshaft position sensor, be sure to inspect the O-ring.
(3) Using an 8 mm socket wrench, install the camshaft position sensor to the cylinder head cover sub-assembly with a new bolt.
Torque:
7.5 N·m {76 kgf·cm, 66 in·lbf}
NOTICE:
- If the camshaft position sensor has been struck or dropped, replace it.
- Make sure that the O-ring is not cracked or moved out of place when installing the camshaft position sensor.
(4) Connect the camshaft position sensor connector.
3. INSPECT FOR ENGINE OIL LEAK
|
|
Click here |


