
Toyota Corolla Cross: Installation
INSTALLATION
CAUTION / NOTICE / HINT
COMPONENTS (INSTALLATION)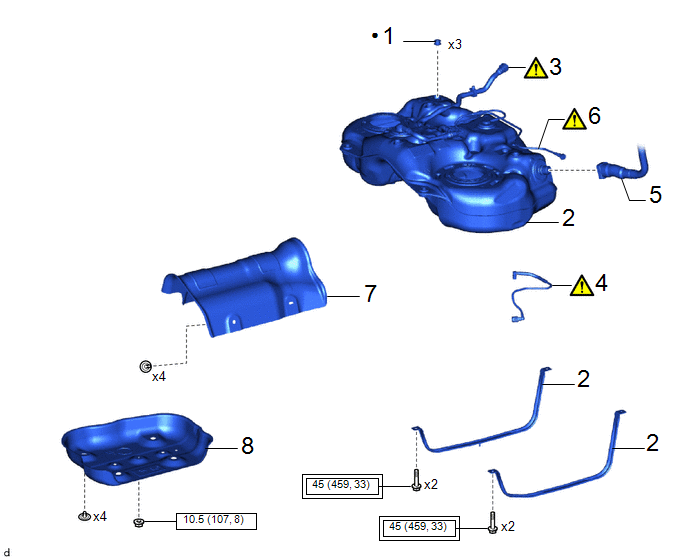
|
Procedure | Part Name Code |
.png) |
.png) |
 |
|---|---|---|---|---|---|
|
1 | NO. 6 FUEL TANK CUSHION |
77656B | - |
- | - |
|
2 | FUEL TANK ASSEMBLY |
77100 | - |
- | - |
|
3 | FUEL CUT OFF W/TUBE |
- |
|
- | - |
|
4 | FUEL TANK MAIN TUBE SUB-ASSEMBLY |
77209F |
|
- | - |
|
5 | FUEL TANK TO FILLER PIPE HOSE |
77210 | - |
- | - |
|
6 | FUEL TANK BREATHER TUBE |
- |
|
- | - |
|
7 | NO. 1 FUEL TANK PROTECTOR |
77641A | - |
- | - |
|
8 | NO. 2 FUEL TANK PROTECTOR |
77642A | - |
- | - |
.png) |
Tightening torque for "Major areas involving basic vehicle performance such as moving/turning/stopping" : N*m (kgf*cm, ft.*lbf) |
.png) |
N*m (kgf*cm, ft.*lbf): Specified torque |
|
● | Non-reusable part |
- | - |
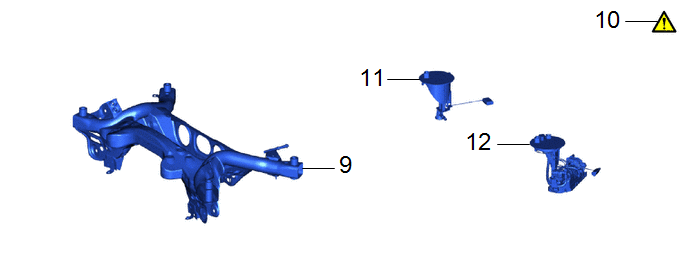
|
Procedure | Part Name Code |
|
|
| |
|---|---|---|---|---|---|
|
9 | REAR SUSPENSION MEMBER SUB-ASSEMBLY |
51206A | - |
- | - |
|
10 | ADD FUEL |
- |
|
- | - |
|
11 | FUEL TANK VENT TUBE ASSEMBLY |
77010 | - |
- | - |
|
12 | FUEL SUCTION TUBE WITH PUMP AND GAUGE ASSEMBLY |
77020A | - |
- | - |
PROCEDURE
1. INSTALL NO. 6 FUEL TANK CUSHION
2. INSTALL FUEL TANK ASSEMBLY
|
|
CAUTION: The fuel tank assembly is very heavy. Be sure to follow the procedure described in the repair manual, or the fuel tank assembly may fall off the engine lifter. .png) |
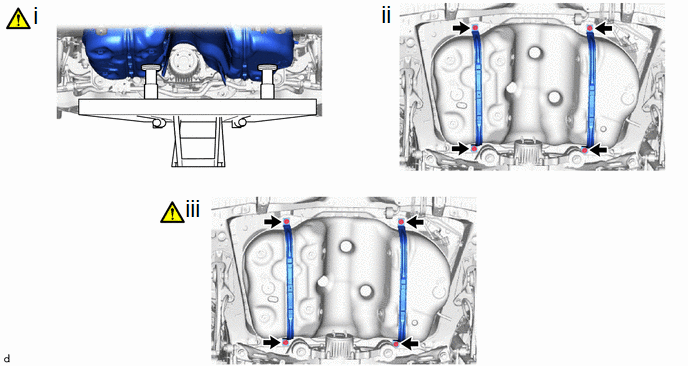
(1) Set the fuel tank assembly on an engine lifter.
NOTICE:
Using height adjustment attachments and plate lift attachments, keep the fuel tank assembly horizontal.
(2) Using the engine lifter, slowly raise the fuel tank assembly, and then temporarily install the fuel tank assembly with No. 1 fuel tank band subassemblies with the 4 bolts.
(3) Tighten the 4 bolts in the order shown in the illustration.
Torque:
45 N·m {459 kgf·cm, 33 ft·lbf}
NOTICE:
- Be careful not to drop the fuel tank assembly.
- When installing the fuel tank assembly, tilt it slightly to prevent it from interfering with the surrounding parts.
3. CONNECT FUEL CUT OFF W/TUBE
.png)
(1) Connect the fuel tube connector to remove the FUEL CUT OFF W/TUBE from the FUEL TANK VENT HOSE SUB-ASSEMBLY.
Click here .gif)
4. CONNECT FUEL TANK MAIN TUBE SUB-ASSEMBLY
.png)
(1) Connectt the fuel tube connector to remove the fuel tank main tube sub-assembly from the fuel pipe.
Click here
5. CONNECT FUEL TANK TO FILLER PIPE HOSE
6. CONNECT FUEL TANK BREATHER TUBE
.png)
(1) Connect the fuel tank breather tube from the fuel tank filler pipe sub-assembly.
Click here
7. INSTALL NO. 1 FUEL TANK PROTECTOR
8. INSTALL NO. 2 FUEL TANK PROTECTOR
Torque:
10.5 N·m {107 kgf·cm, 8 ft·lbf}
9. INSTALL REAR SUSPENSION MEMBER SUB-ASSEMBLY
Click here
10. ADD FUEL
11. INSTALL FUEL TANK VENT TUBE ASSEMBLY
Click here
12. INSTALL FUEL SUCTION TUBE WITH PUMP AND GAUGE ASSEMBLY
Click here


