Toyota Corolla Cross: Removal
REMOVAL
CAUTION / NOTICE / HINT
COMPONENTS (REMOVAL)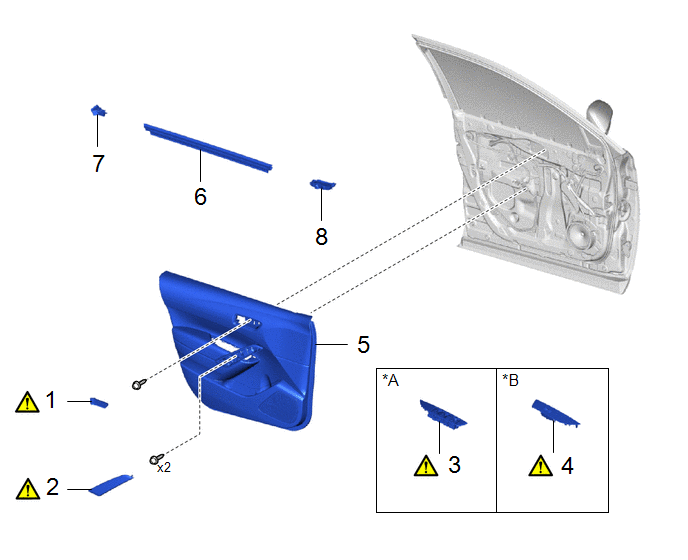
|
Procedure | Part Name Code |
.png) |
.png) |
 |
|---|---|---|---|---|---|
|
1 | FRONT DOOR INSIDE HANDLE BEZEL PLUG |
69284F |
|
- | - |
|
2 | DOOR ASSIST GRIP COVER |
74646 |
|
- | - |
|
3 | MULTIPLEX NETWORK MASTER SWITCH ASSEMBLY WITH FRONT DOOR UPPER ARMREST BASE PANEL |
- |
|
- | - |
|
4 | POWER WINDOW REGULATOR SWITCH ASSEMBLY WITH FRONT DOOR UPPER ARMREST BASE PANEL |
- |
|
- | - |
|
5 | FRONT DOOR TRIM BOARD SUB-ASSEMBLY |
67602 | - |
- | - |
|
6 | FRONT DOOR GLASS INNER WEATHERSTRIP |
68172A | - |
- | - |
|
7 | FRONT DOOR REAR BELT SEAL |
68195B | - |
- | - |
|
8 | FRONT DOOR FRONT BELT SEAL |
68193C | - |
- | - |
|
*A | for Driver Side |
*B | for Front Passenger Side |
|
Procedure | Part Name Code |
|
|
| |
|---|---|---|---|---|---|
|
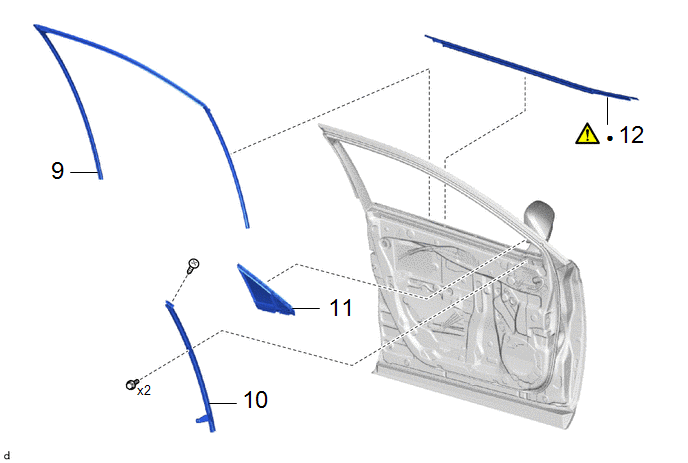
9 | FRONT DOOR GLASS RUN |
68151D | - |
- | - |
|
10 | FRONT LOWER FRONT DOOR FRAME SUB-ASSEMBLY |
67402F | - |
- | - |
|
11 | FRONT DOOR FIX WINDOW GLASS |
68126 | - |
- | - |
|
12 | FRONT DOOR BELT MOULDING ASSEMBLY |
75720 |
|
- | - |
|
● | Non-reusable part |
- | - |
CAUTION / NOTICE / HINT
The necessary procedures (adjustment, calibration, initialization, or registration) that must be performed after parts are removed and installed, or replaced during front door belt moulding assembly removal/installation are shown below.
Necessary Procedure After Parts Removed/Installed/Replaced|
Replaced Part or Performed Procedure |
Necessary Procedure | Effect/Inoperative Function When Necessary Procedures are not Performed |
Link |
|---|---|---|---|
| Door glass run |
Initialize power window control system |
|
|
HINT:
- Use the same procedure for the RH side and LH side.
- The following procedure is for the LH side.
PROCEDURE
1. REMOVE FRONT DOOR INSIDE HANDLE BEZEL PLUG
|
|
Click here |
2. REMOVE DOOR ASSIST GRIP COVER
|
|
Click here |
3. REMOVE MULTIPLEX NETWORK MASTER SWITCH ASSEMBLY WITH FRONT DOOR UPPER ARMREST BASE PANEL (for Driver Side)
|
|
Click here |
4. REMOVE POWER WINDOW REGULATOR SWITCH ASSEMBLY WITH FRONT DOOR UPPER ARMREST BASE PANEL (for Front Passenger Side)
|
|
Click here |
5. REMOVE FRONT DOOR TRIM BOARD SUB-ASSEMBLY
Click here .gif)
6. REMOVE FRONT DOOR GLASS INNER WEATHERSTRIP
Click here
7. REMOVE FRONT DOOR REAR BELT SEAL
Click here
8. REMOVE FRONT DOOR FRONT BELT SEAL
Click here
9. REMOVE FRONT DOOR GLASS RUN
Click here
10. REMOVE FRONT LOWER FRONT DOOR FRAME SUB-ASSEMBLY
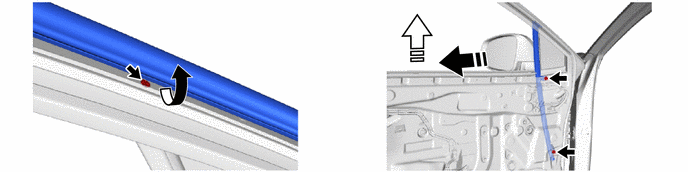
.png) |
Remove in this Direction (1) |
.png) |
Remove in this Direction (2) |
11. REMOVE FRONT DOOR FIX WINDOW GLASS
Click here
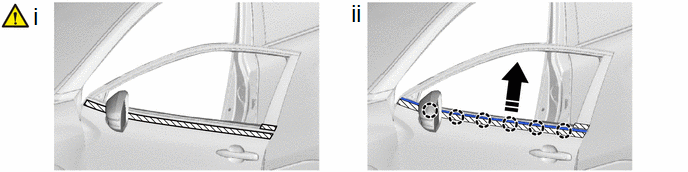
12. REMOVE FRONT DOOR BELT MOULDING ASSEMBLY
|
|
Remove in this Direction |
- | - |
(1) Apply protective tape around the front door belt moulding assembly as shown in the illustration.
(2) Disengage the claws to remove the front door belt moulding assembly as shown in the illustration.


