Toyota Corolla Cross: Installation
INSTALLATION
CAUTION / NOTICE / HINT
COMPONENTS (INSTALLATION)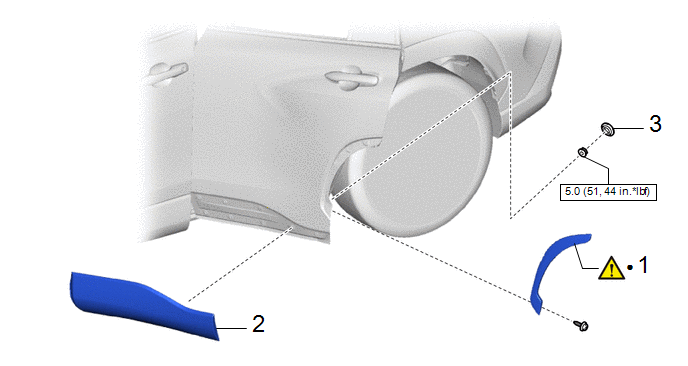
|
Procedure | Part Name Code |
.png) |
.png) |
 |
|---|---|---|---|---|---|
|
1 | REAR DOOR OUTSIDE MOULDING SUB-ASSEMBLY |
75076 |
|
- | - |
|
2 | REAR DOOR OUTSIDE LOWER MOULDING SUB-ASSEMBLY |
75078 | - |
- | - |
|
3 | HOLE PLUG |
- | - |
- | - |
.gif)
.png) |
N*m (kgf*cm, ft.*lbf): Specified torque |
● | Non-reusable part |
CAUTION / NOTICE / HINT
HINT:
- Use the same procedure for the RH side and LH side.
- The following procedure is for the LH side.
PROCEDURE
1. INSTALL REAR DOOR OUTSIDE MOULDING SUB-ASSEMBLY
|
|
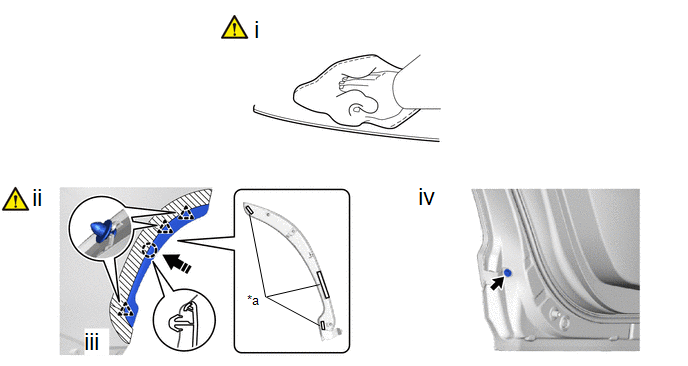
NOTICE: When installing a new rear door outside moulding sub-assembly, heat the rear door panel using a heat light. |
Standard:
|
Item | Temperature |
|---|---|
|
Rear Door Panel | 40 to 60°C (104 to 140°F) |
CAUTION:
- Do not touch the heat light and heated parts.
- Touching the heat light may result in burns.
- Touching heated parts for a long time may result in burns.
.png)
|
*a | Heated Part |
|
*b | Heat Light |
NOTICE:
Do not heat the rear door panel excessively.
|
*a | Double-sided Tape |
- | - |
.png) |
Install in this Direction |
- | - |
(1) Clean the rear door panel.
1. Using a heat light, heat the rear door panel surface.
2. Remove any remaining double-sided tape from the rear door panel.
3. Wipe off any tape adhesive residue with cleaner.
NOTICE:
- Installing the rear door outside moulding sub-assembly with some double-sided tape remaining may cause poor adhesion. Perform this procedure until the tape is sufficiently removed.
- Make sure to use a cloth when removing. Using a screwdriver, etc., may cause damage and poor adhesion.
(2) Install a new rear door outside moulding sub-assembly.
1. Using a heat light, heat the rear door panel surface.
2. Remove the release paper from the rear door outside moulding sub-assembly.
HINT:
After removing the release paper, keep the exposed adhesive free from foreign matter.
3. Engage the clips and claw to install the rear door outside moulding sub-assembly as shown in the illustration.
HINT:
Press the rear door outside moulding sub-assembly firmly to install it.
(3) Remove the protective tape.
(4) Install the screw.
2. INSTALL REAR DOOR LOWER OUTSIDE MOULDING SUB-ASSEMBLY
3. INSTALL HOLE PLUG


