
Toyota Corolla Cross: Installation
INSTALLATION
CAUTION / NOTICE / HINT
COMPONENTS (INSTALLATION)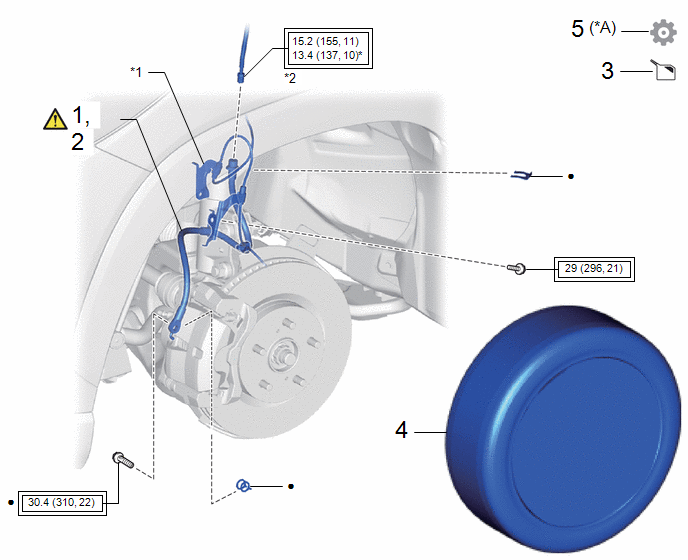
|
Procedure |
Part Name Code |
.png) |
.png) |
.png) |
|
|---|---|---|---|---|---|
|
1 |
INSTALL FRONT FLEXIBLE HOSE |
47313J |
|
- |
- |
|
2 |
CONNECT FRONT FLEXIBLE HOSE |
47313J |
|
- |
- |
|
3 |
BLEED BRAKE LINE |
- |
- |
|
- |
|
4 |
FRONT WHEEL |
- |
- |
- |
- |
|
5 |
INITIALIZATION AFTER RECONNECTING AUXILIARY BATTERY TERMINAL |
- |
- |
- |
|
|
*A |
for HEV Model |
- |
- |
|
*1 |
FRONT SPEED SENSOR |
*2 |
BRAKE LINE |
.png) |
Tightening torque for "Major areas involving basic vehicle performance such as moving/turning/stopping": N*m (kgf*cm, ft.*lbf) |
* |
For use with a union nut wrench |
|
● |
Non-reusable part |
- |
- |
CAUTION / NOTICE / HINT
NOTICE:
- Because the left and right front flexible hoses are not interchangeable, verify the part number when installing the front flexible hoses.
- When reusing the front flexible hoses, use the identification marks created during removal to install each front flexible hose to its original position.
HINT:
- Use the same procedure for the RH side and LH side.
- The following procedure is for the LH side.
PROCEDURE
1. INSTALL FRONT FLEXIBLE HOSE
|
|
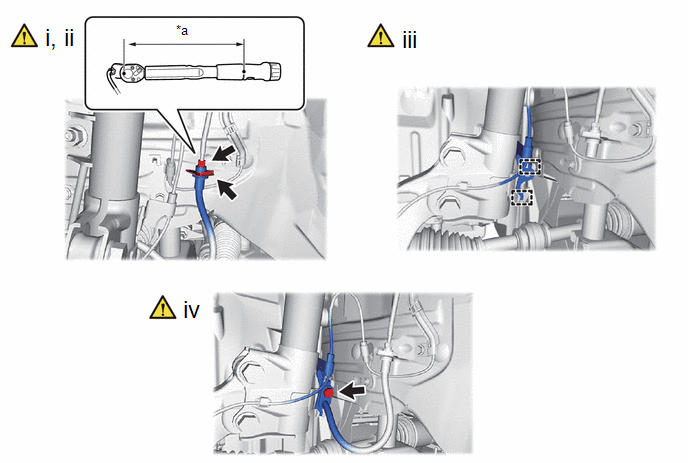
NOTICE: When installing the front flexible hose, minimize twisting of the hose. |
|
*a |
Torque Wrench Fulcrum Length |
- |
- |
(1) Install the front flexible hose with a new clip.
NOTICE:
Install the clip as far as it will go.
(2) Using a union nut wrench, connect the brake line to the front flexible hose while holding the front flexible hose with a wrench.
Torque:
Specified tightening torque :
15.2 N·m {155 kgf·cm, 11 ft·lbf}
NOTICE:
- Do not kink or damage the brake line.
- Do not allow any foreign matter such as dirt or dust to enter the brake line from the connecting parts.
HINT:
- Calculate the torque wrench reading when changing the fulcrum length of
the torque wrench.
Click here
.gif)
- When using a union nut wrench (fulcrum length of 22 mm (0.866 in.)) + torque
wrench (fulcrum length of 162 mm (6.38 in.)):
13.4 N*m (137 kgf*cm, 10 ft.*lbf)
(3) Engage the 2 hooks to install the front speed sensor clamp bracket.
NOTICE:
Do not twist the front speed sensor wire harness when installing it.
(4) Install the front flexible hose and front speed sensor to the front shock absorber assembly with the bolt.
Torque:
29 N·m {296 kgf·cm, 21 ft·lbf}
NOTICE:
Do not twist the front flexible hose when installing it.
2. CONNECT FRONT FLEXIBLE HOSE
|
|
Click here |
3. BLEED BRAKE LINE
- for HEV model:
Click here
- for Gasoline model:
Click here
4. INSTALL FRONT WHEEL
Click here
5. INITIALIZATION AFTER RECONNECTING AUXILIARY BATTERY TERMINAL (for HEV Model)
HINT:
When disconnecting and reconnecting the auxiliary battery, there is an automatic learning function that completes learning when the respective system is used.
Click here


