Toyota Corolla Cross: Inspection
INSPECTION
PROCEDURE
1. INSPECT BACK DOOR LOCK WITH COURTESY LIGHT SWITCH ASSEMBLY (w/o Power Back Door)
(a) Check the operation of the door lock motor.
| (1) Move the back door lock with courtesy light switch assembly to the lock position. |
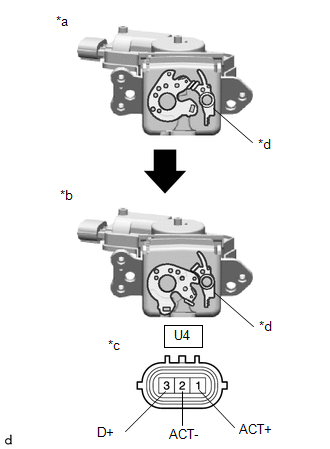 |
|
*a | Unlock | |
*b | Lock | |
*c | Component without harness connected
(Back Door Lock with Courtesy Light Switch Assembly) | |
*d | Latch | | |
(2) Apply auxiliary battery voltage to the door lock motor assembly and check the operation of the door lock motor.
OK:
|
Tester Connection | Condition |
Specified Condition |
|
U4-1 (ACT+) - U4-2 (ACT-) |
U4-1 (ACT+) → Auxiliary battery positive (+) U4-2 (ACT-) → Auxiliary battery negative (-) |
Unlock |
If the result is not as specified, replace the back door lock with courtesy light switch assembly.
(b) Check the operation of the back door courtesy switch.
(1) Measure the resistance according to the value(s) in the table below.
Standard Resistance:
|
Tester Connection | Condition |
Specified Condition |
|
U4-2 (ACT-) - U4-3 (D+) |
Lock | 10 kΩ or higher |
|
U4-2 (ACT-) - U4-3 (D+) |
Unlock | Below 1 Ω |
If the result is not as specified, replace the back door lock with courtesy light switch assembly.
2. INSPECT BACK DOOR LOCK WITH COURTESY LIGHT SWITCH ASSEMBLY (w/ Power Back Door)
(a) Check the operation of the closer motor.
| (1) Apply auxiliary battery voltage and check the operation of the closer motor.
OK: |
Tester Connection | Condition |
Specified Condition | |
U18-1 (M-) - U18-2 (M+) |
U18-1 (M-) → Auxiliary battery positive (+) U18-2 (M+) → Auxiliary battery negative (-) |
Open Operation | |
U18-1 (M-) - U18-2 (M+) |
U18-2 (M+) → Auxiliary battery positive (+) U18-1 (M-) → Auxiliary battery negative (-) |
Close Operation | If the result is not as specified, replace the back door lock with courtesy light switch assembly. |
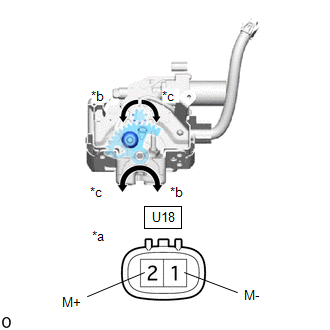 |
|
*a | Component without harness connected
(Back Door Lock with Courtesy Light Switch Assembly) | |
*b | Close Operation Direction | |
*c | Open Operation Direction | | |
(b) Check the resistance of the half latch switch.
| (1) Measure the resistance according to the value(s) in the table below.
Standard Resistance: |
Tester Connection | Condition |
Specified Condition | |
U17-3 (CLS) - U17-1 (E) |
Open position | Below 1 Ω | |
U17-3 (CLS) - U17-1 (E) |
Open position → Half-latch position |
Below 1 Ω → 10 kΩ or higher | |
U17-3 (CLS) - U17-1 (E) |
Half-latch position |
10 kΩ or higher | |
U17-3 (CLS) - U17-1 (E) |
Full-latch position |
10 kΩ or higher | |
U17-3 (CLS) - U17-1 (E) | Overstroke position |
10 kΩ or higher | If the result is not as specified, replace the back door lock with courtesy light switch assembly. |
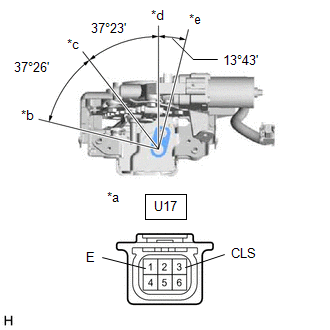 |
|
*a | Component without harness connected
(Back Door Lock with Courtesy Light Switch Assembly) | |
*b | Open Position | |
*c | Half-latch Position | |
*d | Full-latch Position | |
*e | Overstroke Position | | |
(c) Check the resistance of the full latch switch.
| (1) Measure the resistance according to the value(s) in the table below.
Standard Resistance: |
Tester Connection | Condition |
Specified Condition | |
U17-1 (E) - U17-4 (CTY) |
Open position | Below 1 Ω | |
U17-1 (E) - U17-4 (CTY) |
Half-latch position |
Below 1 Ω | |
U17-1 (E) - U17-4 (CTY) |
Half-latch position → Full-latch position |
Below 1 Ω → 10 kΩ or higher | |
U17-1 (E) - U17-4 (CTY) |
Full-latch position |
10 kΩ or higher | |
U17-1 (E) - U17-4 (CTY) | Overstroke position |
10 kΩ or higher | If the result is not as specified, replace the back door lock with courtesy light switch assembly. |
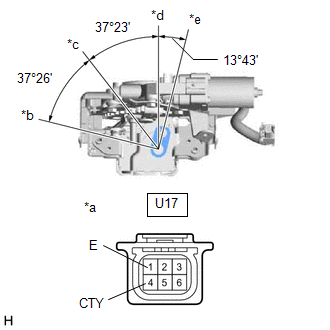 |
|
*a | Component without harness connected
(Back Door Lock with Courtesy Light Switch Assembly) | |
*b | Open Position | |
*c | Half-latch Position | |
*d | Full-latch Position | |
*e | Overstroke Position | | |
(d) Check the resistance of the pawl switch.
| (1) Measure the resistance according to the value(s) in the table below.
Standard Resistance: |
Tester Connection | Condition |
Specified Condition | |
U17-2 (FSW) - U17-1 (E) |
Open position | 10 kΩ or higher | |
U17-2 (FSW) - U17-1 (E) |
Open position → Half-latch position |
10 kΩ or higher → Below 1 Ω → 10 kΩ or higher | |
U17-2 (FSW) - U17-1 (E) |
Half-latch position |
10 kΩ or higher | |
U17-2 (FSW) - U17-1 (E) |
Half-latch position → Full-latch position |
10 kΩ or higher → Below 1 Ω → 10 kΩ or higher | |
U17-2 (FSW) - U17-1 (E) | Full-latch position |
10 kΩ or higher | |
U17-2 (FSW) - U17-1 (E) |
Overstroke position |
10 kΩ or higher | If the result is not as specified, replace the back door lock with courtesy light switch assembly. |
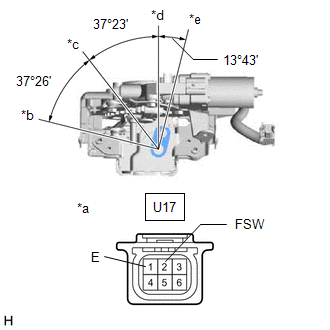 |
|
*a | Component without harness connected
(Back Door Lock with Courtesy Light Switch Assembly) | |
*b | Open Position | |
*c | Half-latch Position | |
*d | Full-latch Position | |
*e | Overstroke Position | | |
(e) Check the resistance of the sector switch.
| (1) Measure the resistance according to the value(s) in the table below.
Standard Resistance: |
Tester Connection | Condition |
Specified Condition | |
U17-6 (OPN) - U17-1 (E) |
Sector gear in neutral position (Sector switch on) |
Below 1 Ω | |
U17-6 (OPN) - U17-1 (E) |
Sector gear not in neutral position (Sector switch off) |
10 kΩ or higher | If the result is not as specified, replace the back door lock with courtesy light switch assembly. |
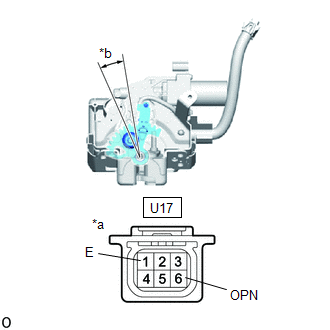 |
|
*a | Component without harness connected
(Back Door Lock with Courtesy Light Switch Assembly) | |
*b | Sector Gear in Neutral Position | | |
READ NEXT:
INSTALLATION CAUTION / NOTICE / HINT COMPONENTS (INSTALLATION)
Procedure Part Name Code
1 BACK DOOR LOCK WITH COURTESY LIGHT SWITCH ASSEMBLY
69350P
REMOVAL CAUTION / NOTICE / HINT COMPONENTS (REMOVAL)
Procedure Part Name Code
1 REAR CENTER SEAT OUTER BELT ASSEMBLY
73350C -
- -
2 BEN
SEE MORE:
UTILITY ALL READINESS
HINT:
With "All Readiness", you can check whether or not the DTC judgment has been completed by using the GTS.
Check "All Readiness" after simulating malfunction symptoms or for validation after finishing repairs.
(a) Clear the DTCs (even if no DTCs are s
Operating instructions
Right turn
Lane change to the right
(move the lever partway and
release it)
The right hand signals will flash 3
times.
Lane change to the left
(move the lever partway and
release it)
The left hand signals will flash 3
times.
Left turn
■Turn signals can be oper