Toyota Corolla Cross: Inspection
INSPECTION
PROCEDURE
1. INSPECT REAR SPEAKER ASSEMBLY LH (w/o Stereo Component Amplifier)
(a) With the rear speaker assembly LH installed, check that there is no looseness or other abnormalities.
(b) Check that there is no foreign matter in the rear speaker assembly LH, no tears on the rear speaker assembly LH cone or other abnormalities.
|
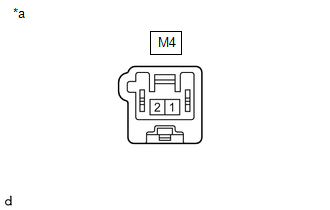
(c) Measure the resistance of the rear speaker assembly LH. Standard Resistance:
If the result is not as specified, replace the rear speaker assembly LH. |
|

2. INSPECT REAR SPEAKER ASSEMBLY RH (w/o Stereo Component Amplifier)
(a) With the rear speaker assembly RH installed, check that there is no looseness or other abnormalities.
(b) Check that there is no foreign matter in the rear speaker assembly RH, no tears on the rear speaker assembly RH cone or other abnormalities.
|
(c) Measure the resistance of the rear speaker assembly RH. Standard Resistance:
If the result is not as specified, replace the rear speaker assembly RH. |
|
3. INSPECT REAR SPEAKER ASSEMBLY LH (w/ Stereo Component Amplifier)
(a) With the rear speaker assembly LH installed, check that there is no looseness or other abnormalities.
(b) Check that there is no foreign matter in the rear speaker assembly LH, no tears on the rear speaker assembly LH cone or other abnormalities.
|
(c) Measure the resistance of the rear speaker assembly LH. Standard Resistance:
If the result is not as specified, replace the rear speaker assembly LH. |
|
4. INSPECT REAR SPEAKER ASSEMBLY RH (w/ Stereo Component Amplifier)
(a) With the rear speaker assembly RH installed, check that there is no looseness or other abnormalities.
(b) Check that there is no foreign matter in the rear speaker assembly RH, no tears on the rear speaker assembly RH cone or other abnormalities.
|
(c) Measure the resistance of the rear speaker assembly RH. Standard Resistance:
If the result is not as specified, replace the rear speaker assembly RH. |
|


